 |
| Before... |
If you’re anything like me, your house ended up filled with a lot of packaging material over Christmas. All that online shopping for gifts to give produces a lot of cardboard boxes, then of course the actual gifts you receive also sees you gaining a whole bunch of packaging material of a cardboard, polystyrene and plastic nature. In my case this was compounded by the need to buy a new computer monitor – my old one had been a bit spotty for a while but finally died on Boxing Day, necessitating a trip out to town and adding to the packaging pile..
For a normal person, this waste is annoying Christmas detritus which forces you to try to puzzle out which of your many bins is the correct place to put it all. Can you recycle this? Does it needs to be torn up first? When are they collecting the bins next, anyway, with all the holiday stuff going on? Especially when one lives in a block of flats and has shared bins with other families there can become a bit of a war over who gets their stuff outside first, lest it be forced to pile up in your kitchen bin.
 |
| ...And After |
Normal, however, is not a word often used to describe George Francis Ninian Quail. No, when I see cardboard and polystyrene I don’t think “This needs to go in the bin”. I don’t think, “How many forests have been chopped down to pay for this wintertime capitalist orgy of spending.” I don’t even think, “What would monostyrene look like, anyway?”
Instead I think, “Fantastic! Let’s get some simple scratch-building on the go!”
 |
| Last year's four buildings all lined up on a shelf. |
 |
| The Torchic gets cover, right? I mean, he's pretty well blocked by the terrain... |
The method applied was basically the same as before, except with a bit more variation in sizes. All of them would be painted roughly the same so that they would be easily combined – put two or more corners together and it can end looking like a single larger building has been ruined. This also means internal floors should be roughly the same height, so all levels would be roughly 60mm high from floor to ceiling: I add guidelines in pencil here to show me where the floors should go.
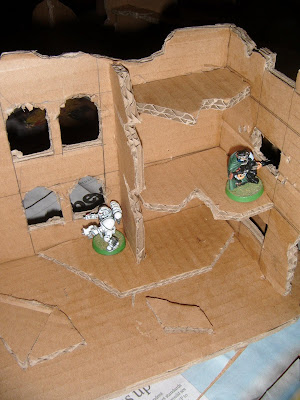
The terrain bases are cardboard rectangles cut by scissor to give them a more natural oval shape; the rest of the walls were cut with steel ruler and Stanley knife, first as rectangles then with chunks taken out of them to create the jagged feel around the edge. Some of the larger walls have windows and doors cut out of them to provide entry/egress/firing points and also just to liven up an otherwise dull flat surface.
 |
| I also added some graffiti to some large flat sections |
 |
| Examples of the bullet holes - the pin holes are on the left, the ones on the right have been expanded. |
The walls are fixed together and to the base using PVA glue with whole or parts of cocktails sticks used as a sort of dowling to hold the pieces in place. The ground floor can be glued in place, butting against both the walls to also give them a little more support. After that any subsequent floors are added in the same fashion as the walls, cutting them to shape and then fixing with PVA glue and cocktail sticks. Some smaller walls self-support a bit but the floors really need the dowling to hold them in place. Finally I add any wee internal walls.
 |
| This church-like building with the arched windows is quite large and wasn't going to stand without downling to help it. |
 |
| My workspace. Sorry, Ruth, it's nothing personal: I just needed to cut some lines on newspaper! |
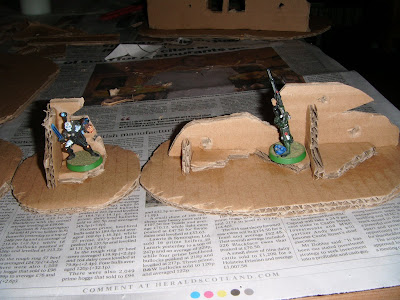
You’ll see from the pics above I have four smaller ruins – two corner sections just over a storey high, one tiny corner section that’s just big enough for a figure to hide behind and one T-junction like thing with very short walls, making it more half-cover than full LoS blocking.
 |
| The smaller ruins. |
The two larger pieces are a bit more impressive, complete with an attempt at cutting internal windows and adding internal walls. I'm pondering whether I should spend some time making another larger ruin before moving on to the next stage... or if I should just add themed ALT text to all my images.
No comments:
Post a Comment